Atom Editor For Python Programming
So far we have used command prompt for our Python Programming. Command prompt is a minimalist native editor for almost all the programming languages on any Microsoft operating system, which does not require any special setup to run. However this doesn’t make it the most efficient option. So now the question here is, if not command prompt then what?
There are so many options available in the market but in this tutorial we will explore the one which is quite popular, better known as the “Atom Editor”. In this blog I will show you how to download and setup the atom editor for python programming.
What makes Atom Editor the choice of the programmer?
Atom is an open source text editor but that doesn’t make it any special. What makes it so different is that, even while being just an editor it provides IDE like functionalities to its users.
How to Install Atom Editor on Windows 10?
Installing Atom Editor is no rocket science. In fact installing Atom Editor is as easy as peeling potatoes. Let’s see how to install Atom Editor for Python Programming.
Step 1: Download the Editor.
In order to install it we first need to download it. As it is an open source software thus you can get your copy for free. You can download Atom Editor from the home page of its website.
Step 2: Install the Atom Editor
As mentioned above, installing Atom Editor is the easiest thing one can ever do. Simply locate the setup file which you just download and then double click and run the installer. That’s all you have to do. The installer will launch the Atom editor once it’s done installing it. Installation might take some time depending upon the configuration of your machine.
How to configure the Atom Editor for Python Programming.
Atom is a text editor it doesn’t come with any special functionalities. For instance you can use the Atom Editor to write your Python code/script but you cannot execute it. In order to get all those special IDE like features we need to configure it. By that I mean installing some plugins and configuring their settings according to your needs.
Plugging 1: Script
Writing code into an editor and executing it into another software is nothing but a pain which nobody wants to experience. The plugging “Script” let’s you run your program into the Atom Editor itself.
To install this plugging first go to the “file menu” and then select “Settings” or you can use keyboard shortcut “Ctrl +;”. Now select “Install” option from the left had side bar of the “Setting” page.
On this install page you will see a search bar. You need to write the name of the plugging which is “Script” into this bar. Next you need to select the plugging with the name “Script” created by the “rgbkrk”. Just select it and press the install button. This will install the desired plugging on your atom editor.
If you are facing trouble in searching this plugging then you can also use the direct link of the same plugging here.
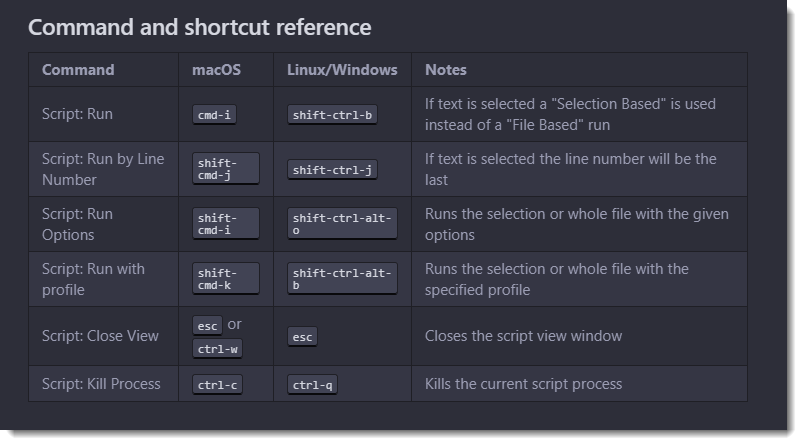
Once you are done installing the “Script” Plugging then you are all set to execute your program natively like you used to do in any other IDE. To execute your Python Program using the same you can use the keyboard shortcut “Shift+Ctrl+B”.
Here are a few other keyboard shortcuts which you can use with this plugging.

Other Plugging Options
Along with “Script” you can also install autocomplete-python. This plugging will help you by showing suggestions such as the name of the Python packages, variables, methods and functions. The installation process is the same as shown above.
That’s all you need to do to learn python programming.
Thanks and have a great day!


