
Oracle Database 21c is the newest release from Oracle Corporation in it’s Oracle Database line. Today in this tutorial I will show you how to install Oracle 21c on Windows 10 or Windows 11 x64 Professional version.
Minimum Hardware Requirements For Oracle 21c
- RAM – Minimum 2GB
- Network – Server Must be connected to the Internet
- Video Adapter – 256 Colors
- Display Resolution – At least 1024×768
- Disk Space For Temporary Directory – At least 130MB
- SWAP Space – Double the amount of RAM installed
- 10GB of empty space on Hard Disk Drive
- Minimum local disk storage space for Oracle software – At least 350 MB for an Instant Client installation, At least 1536 MB for Administrator installation, At least 1024 MB for Runtime installation, At least 180 MB for Custom installation
- Recommended file system – Oracle ASM or NTFS
- A processor based on either Intel EM64T or AMD64 architecture.
Minimum Software Requirements For Oracle 21c
Oracle Database 21c does not support x32 bit operating system. So, please refrain from installing it on your x32 bit operating system.
- Windows 10 x64 – Pro, Pro for Workstations, Enterprise, and Education editions
- Windows 11 x64 – Pro, Enterprise, and Education editions
- Windows Server 2012 R2 x64 – Standard, Datacenter, Essentials, and Foundation editions
- Windows Server 2016 x64 – Standard, Datacenter, and Essentials editions
- Windows Server 2019 x64 – Standard, Datacenter, and Essentials editions
- Windows Server 2022 x64 – Standard, Datacenter, and Essentials editions
Free RAM for Oracle 19c.
Somebody commented on my 18c installation video and said that he has 3 or maybe 4 GB RAM installed but the Oracle Universal Installer (OUI) is still giving the minimum hardware compatibility error.
Therefore, let me clear the confusion here – No matter what size of RAM you have installed in your system, installation will not proceed unless 2GB free space of RAM is available. Consequently, 2GB of RAM must be free for Oracle 21c out ******of whatever size RAM you have installed in your system.
How To Download Oracle Database 21c
In this step I will show you, how you can download your copy of Oracle Database 21c for Windows 10 or 11 x64 professional version for FREE. This download is going to be around 3GB in size.
Currently Oracle Database 21c is only available for Linux x86-64, HP-UX ia64 and Microsoft Windows x64 (64bit) operating system. Unfortunately Oracle 21c is not available for 32 bit Operating systems.
Since Oracle Database 18c, Oracle introduced a new installation process called image-based installation. In this new process we only have to download 1 zip file which is unlike Oracle 12c or previous versions where we had to download two or more zip files.
Oracle Database 21c Download Link www.Oracle.com/Download
Go to the above link and the select Oracle Database 21c and then click on the Windows operating system x64.
After that you have to validate the download by logging in to your account. If you don’t have any account on Oracle.com then create one. It’s free of cost. As soon as you hit the sign-in your download will start automatically.
Till now Oracle 21c is only available in two editions –
- Oracle Database 21c Enterprise Edition
- Oracle Database 21c Standard Edition 2
Both these editions are bundled in the same file that I mentioned earlier. You don’t need to download them separately.
I have explained the process of downloading Oracle Database 21c in my video tutorial. If you still have any confusion then check out the video.
Setting Up The Location
With the launch of Oracle Database 18c Oracle introduced a new installation process called image based installation. In this process the location where setup.exe file of Oracle Database is located will become the Oracle Base / Oracle Home location of the Oracle DB.
The Oracle Base is the location where all the binaries and libraries of the Oracle Database are placed. Since all the Oracle DB files are going to be stored onto this location thus it needs to be decided beforehand.
I would suggest you to create a directory onto your hard drive partition which has maximum free space. Also, make sure not to place this directory on the partition which holds your operating system.
Install Oracle Database 21c
Installing Oracle Database 21c on windows 10/11 operating system is a 4 step process. In these four steps we will be configuring Oracle Database with a starter database.
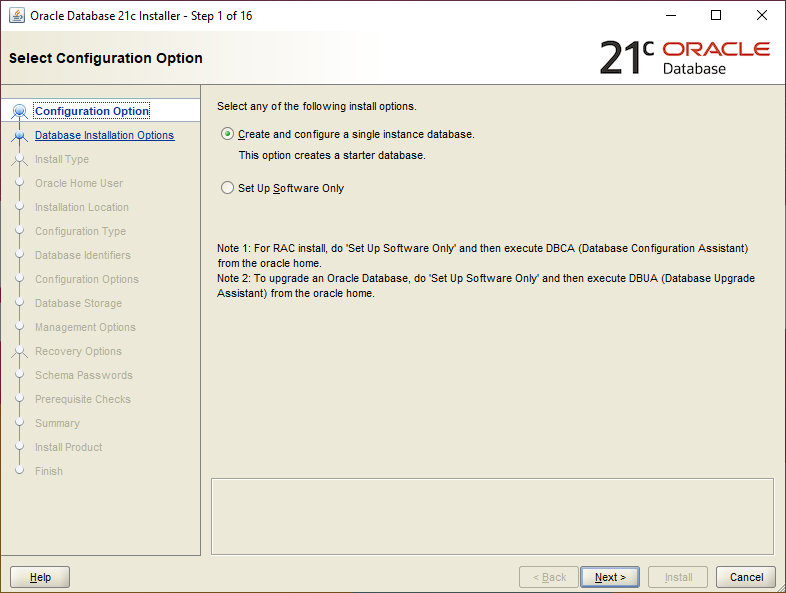
Step 1: Configuring options
Here you will have two options which are
- Create and Configure a Single Instance Database, and
- Setup software only
Select the second option only when you are either upgrading your oracle database or setting up a RAC. Go with the first option if you are installing fresh copy of Oracle Database. The first option will also create a starter database for you to practice.
For this demonstration I will select the first option.
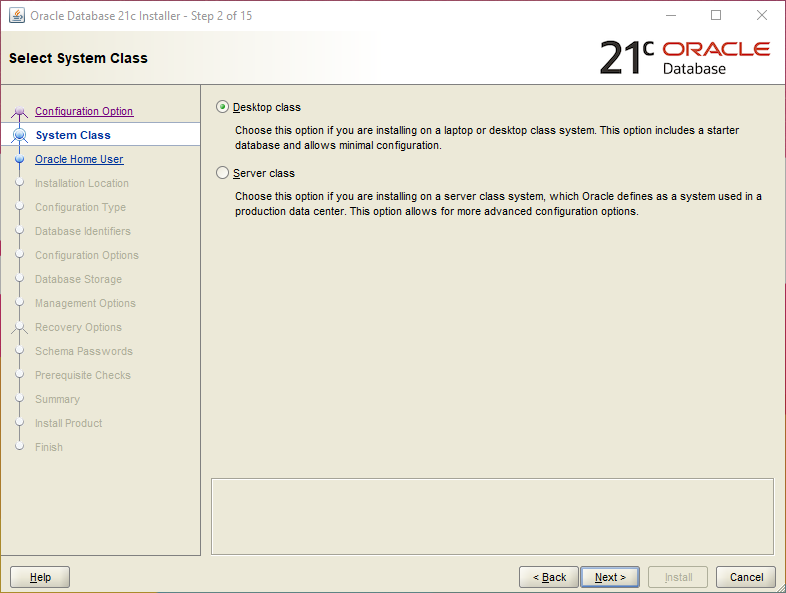
Step 2: System class
This step will decide what sort of installation you want to proceed with. Here you have to select one out of two class of your oracle database 21c. Option which are available here are –
- Desktop class, and
- Server class
Desktop class is the minimal configuration of your Oracle Database. You select this option when you are installing your Oracle DB on your desktop or laptop.
Server class, as the name suggests is a more advance installation of the Oracle DB. You select this option when you are installing your Oracle Database on a server grade systems.
For the demonstration here we will go with the 1st option which is desktop-class.
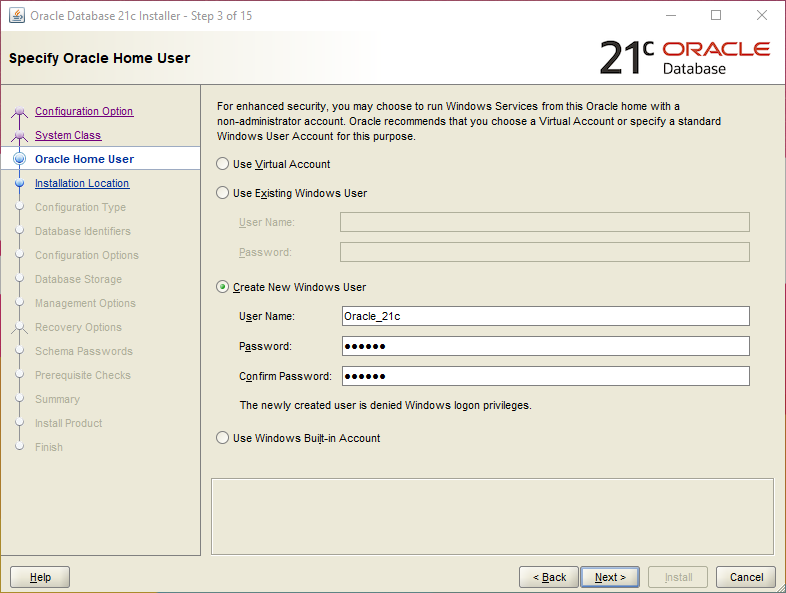
Step 3: Oracle Home User
In order to keep everything in control Oracle Server needs a windows user. And, in this step Oracle Universal installer (The OUI) will give you 4 options to configure a windows user for your Oracle Database. These 4 options are –
- User Virtual Account You select this option when you neither want to create a new nor want to use an existing windows user
- Use Existing Windows User As the name suggests you go with this option when you want to use an existing windows administrative or a standard windows user for your Oracle Database
- Create A New Windows User This is the most recommended option. In this option you create a windows user which is dedicated only for your Oracle Database. This newly created user doesn’t have logon privileges . Which means you will not be able to log on to your windows OS using this user.
- Use Windows Built-In Account This option will allow you to use all the windows accounts which windows operating system has created for you during the installation.
My recommendation is to go with the 3rd option and create a new Windows user which is solely dedicated for the work of your Oracle Database.
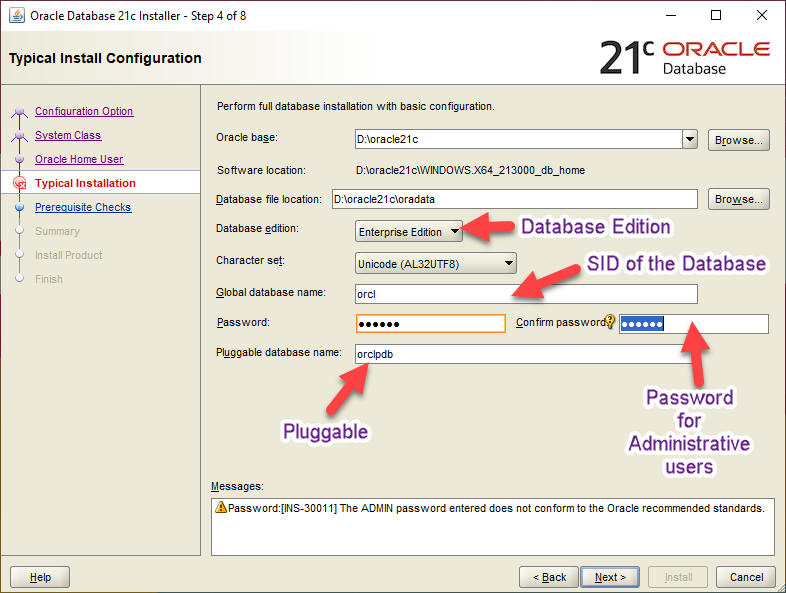
Step 4: Typical Installation
This is most crucial step of the installation. Here you will configure the heart of your Oracle Database 21c. I would suggest you to be very careful with this step.
Recommended Action: refer to the attached picture for the recommended values
Oracle Base: This is the base directory of all your Oracle products. This will be the location where all the necessary directories like Oracle Home of your Oracle 21c will be placed.
This is an editable drop down menu. Here you may already have one or two option in the menu which you can choose as your Oracle Base location. You can also select one of your own locations as oracle base if you want to, for that simply press the browse button and select your desirable location.
Software Location: Software location also known as Oracle Home or DB Home. This is a non-editable field. In image-based installation we cannot change the Oracle home location. The Oracle Universal installer (OUI) takes the location of setup files and assign it as a software location.
Database File location: This is the location where all the core files of the Oracle Database 21c are stored. By core files I mean Data files, redo log files, control files, server parameter files and the password files. For the proper functioning of the Oracle DB all these files are very important.
Database Edition: This is another drop down list. This is already populated field with all the available edition of the Oracle Database 21c. Currently Oracle 21c is available in two editions.
- Enterprise Edition, and
- Oracle Standard Edition 2
Character Set: This field lets you set the character set of your database.
Global Database Name: Global database name is the name of your database and serves as your database SID. You will need this global database name for making connection with your database using software like SQL Developer.
By default it is set as ORCL. If you want you can change it but I would recommend you to save the information somewhere securely.
Password: This will be the password for your Oracle Database’s administrative users like SYS and SYSTEM. These administrative users are the special users. Using them you can change the core settings of your Oracle Database thus it is always advisable to set a strong password for them.
Pluggable Database name: The last field of this step is the pluggable database name. Here you will set a unique name for the pluggable database. By default it is set to “ORCLPDB” if you want you can change it. This pluggable database will serve as a template for all the PDBs that you will be creating in the future.

Step 5: Prerequisite Check
Once you are done with the typical installation next the OUI will check all the prerequisites. If everything goes well you will be all set for the installation otherwise you will see the error(s) that you have to work on to install your Oracle Database 21c.
Step 6: Summary
Once you have successfully pass the prerequisite check you will see the summary of your configuration. Here I would suggest you to save it for future use. To save this summary simply click the “Save Response File” button. And then press the install button to start the installation.
Step 7: Oracle EM
Once the installation is done the Oracle Universal Installer will show you a URL. Using this URL you can access the Oracle Enterprise manager. To know about Oracle Enterprise Manager check out the series that I did a short while ago.
That’s a detailed tutorial on how to install Oracle Database 21c on Windows 10/11 Professional x64 version. If you have any doubts send me a DM on my Instagram.
Thanks and have a great day!


