
When I did a tutorial on How to unlock HR user, I got so many questions about SH schema. Therefore, I have decided to do a dedicated tutorial on how to install and configure SH schema in Oracle Database 19c.
What is SH schema?
SH stands for Sales History. It is a sample schema which comes with large amount of data organized for analytical processing. And since it is a sample schema therefore it is available free for practice purposes.
You can read more such frequently asked questions about SH user later in this tutorial –
But for now, let’s focus on how to install and configure it –
Setup for The SH Schema –
So, for the demonstration I will be installing Sample Schema SH on Oracle Database 19c which is configured on Windows 10 operating system.
Furthermore, this Oracle 19c has 1 root container database CDB$Root and 1 pluggable database orclpdb. Though I am using Oracle 19c, but you can follow these steps for Oracle 12c, 18c or for any other version as long as it’s based on multi-tenant architecture. As the process is the same.
Download The SH schema –
Since Oracle Database 12c Release 2 oracle does not ship sample schemas with the bundle except the HR user. Therefore, we need to download them from GitHub.
Also, here is the link for the GitHub Repository. From this link you can download all the sample schemas according to the version of your Database.
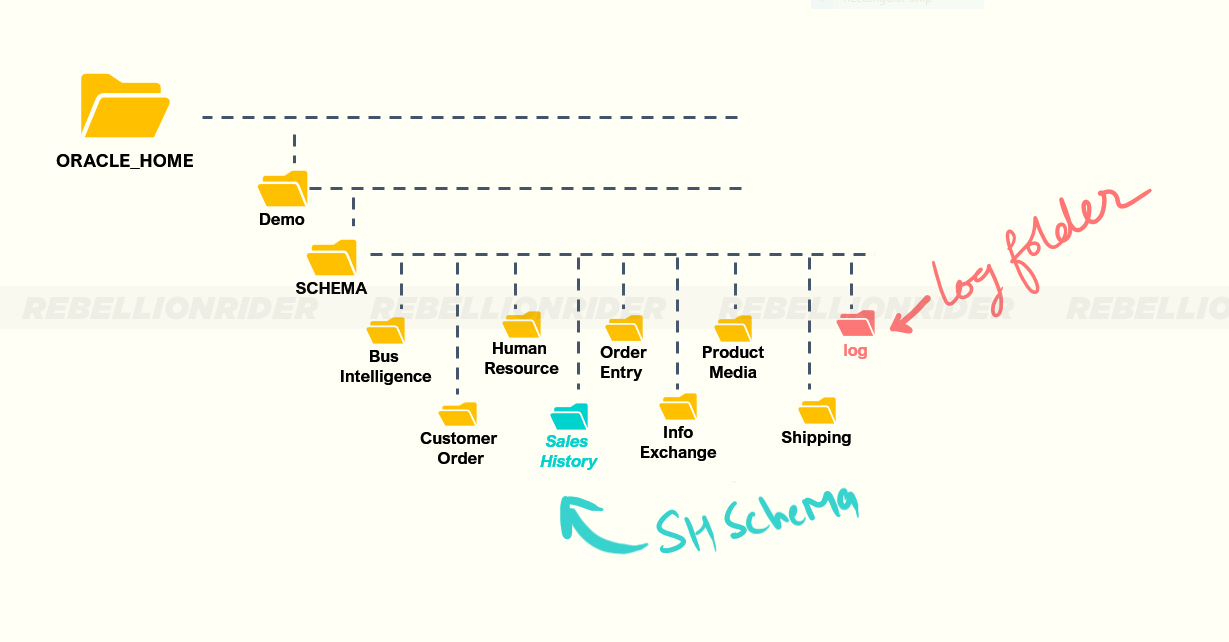
Directory Setup For The SH schema –
Once you are done downloading, next you have to extract the content of that zip file. Though you can do it anywhere in your file system, but I suggest you extract the content in the directory that Oracle Universal Installer has created for all the sample schemas. The location of that directory is –
%oracle_home% \demo\schema
Furthermore, here oracle Home is the base directory where your Oracle Database Management Software is installed.
Suggested Reading: How To Find Out The Oracle Home
Don’t delete the log Folder –
In that directory you already have HR schema along with a few scripts. Here except from this folder with the name “log” nothing is important. Therefore, if you want you can delete them as we will be replacing all these files and folders with the one which we just downloaded.
Just don’t delete this log folder. It is important for installing the sample schema. Therefore, make sure you have this folder. Also in case you don’t then create one and name it “log” immediately.
Once you are done here your directory structure will look something like this –
Four Scripts For SH Shema –
There are total 4 scripts which are executed for creating and configuring the SH schema in your Oracle Database. And these 4 scripts are –
- sh_main.sql – This is the main script
- csh_v3.sql – This script will create the objects
- lsh_v3.sql – This script will load the tables
- psh_v3.sql – This script will perform the post load operations.
To install the SH schema in our Oracle Database we will execute a script. Its name is “sh_main.sql”. This sh_main.sql will in turn execute three more scripts.
One for creating the objects like Tables and their constraints. One for populating those tables and one for post load operations.
Additionally, this post load operation script will create all the indexes, views, materialize views, dimensions and comments on the object of the SH schemas.
Furthermore, you can find all 4 of these scripts inside the sales_history folder which you just downloaded.
Modify The Script –
I have seen that most of these scripts are optimized for Linux operating systems. Therefore, if you are installing SH schema on a Windows machine, then you may face some errors. In order to avoid those we will have to do some slight modifications.
Moreover, in case your Oracle Database is configured on Linux then you can skip this step.
Among those 4 scripts the modification will be done in just two. These two scripts are –
- sh_main.sql, and
- lsh_v3.sql
Let’s start with the “sh_main.sql” –
In this script you have to replace the command __SUB__CWD__ with the directory location of the scripts. This will be the location where we have extracted our schemas.
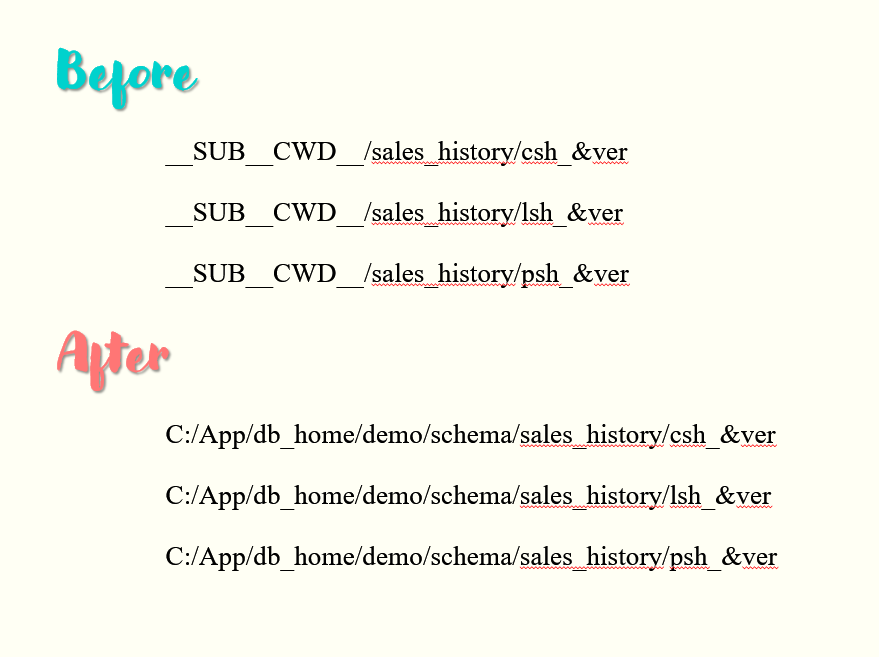
The value (C:/App/db_home/demo/schema/) showed above for the __SUB__CWD__ could be different in your case. So, specify accordingly.
Now the second script “lsh_v3.sql” –
In this script you will simply have to replace the keyword NEWLINE with the escape character ‘\n’. Make sure to enclose the \n inside a pair of single quotes (‘’).
That’s all we have to do.
Run the sh_main.sql script –
In order to run this script, we will need total 9 things. Among those 9 first will be the location of the sh_main.sql script. Rest 8 will be the parameters for installing the SH schema in Oracle Database. These 8 parameters are
1 – Password which you want to assign to your SH user.
2 – Name of the default tablespace
3 – Name of the temporary tablespace
4 – Password of your SYS user
5 – Directory path of your data files. This will be the path where compiler can find all the SH schema related files. Like lsh_v3.sql, csh_v3.sql, psh_v3.sql and others.
6 – Location path of your log folder
7 – Version of the schema you are installing.
8 – connect string
To install the SH schema in Oracle Database we must specify the values for each of these parameters and in the same order.
What could be the possible values for these parameters –
Password: You can set whatever password you want for your sh schema. For the demonstration I will set my password as sh_pass.
Default and Temporary Tablespace – Every schema holds some objects, transactional data, temporary segments etc. To store this data, we need tablespaces. Here as Default tablespace I will specify “Users” and as temporary tablespace I will specify “Temp”.
To find out the names of the tablespaces created in your database you can query dba_tablespaces view, like this –
SELECT tablespace_name, contents FROM dba_tablespaces;
I have also made a quick video demonstrating this process. You can check it out here
Using system and sysaux tablespace is not recommended, so try to avoid them.
Password of The Sys User – As the scripts will be creating and configuring the user thus, they will need to connect with the database using the sys user. Therefore, we need to specify the password of the sys user here.
This will be the password which you will configure during the installation of the Oracle Database.
Data File Directory Location – This will be the location of the directory “sales_history” which you just downloaded.
In my case this location is this
C:/App/db_home/demo/schema/sales_history/
In your case it could be different.
Log Directory Path – Here you have to specify the location of the log folder. This is the same folder which I asked you to not delete earlier in this tutorial.
In my case this location will be this –
C:/App/db_home/demo/schema/log/
Must Remember
While specifying both these locations make sure of one thing –
- Both the location paths must always end with a slash (/).
Just take care of this and your installation of the SH schema will be error free.
Version – This is the version of the sample schemas that you are installing. Right now when I am creating this tutorial it’s “v3”.
You can find out the version of the sample schema that you have downloaded just by looking at the names of the chs_v3, lsh_v3 and psh_v3 scripts. You must have noticed that the name of all these files are ending with the same string “v3”. The string with which their name is ending is the version of the sample schema.
Connect String – This string is created using three entities which are
- Domain name
- Port Number
- Target Database
Domain name and port number will identify the location of the oracle database in the network. Whereas target database is the one where you want to install the sample schema SH.
This connect string will help the Oracle Engine to know the target destination where sample schema SH will be installed.
This string is formatted in a special manner, like this
Domain_name:port_number/target_database
You can find the values of domain name and port number from “Listener.ora” file. Furthermore, the target database could be a database of your choice.
In my case, for the demonstration this connect string will look something like this –
localhost:1521/orclpdb
Where orclpdb is the name of the pluggable database.
The slash sign –
Unlike previous string, in the connect string the slash sign must always be a forward slash (/).
Install the SH Schema –
Now to install the SH schema on your Oracle Database you need to combine all these parameters and put them into a single string. Also, make sure to separate each of them using a white space.
Step 1 – First launch your command prompt with administrative privileges.
Step 2 – Next connect with your database using the sys user.
SQLPLUS / as sysdba
Also, make sure the pluggable database into which you are installing the SH schema is open for read write operation.
COLUMN name FORMAT a10;
SELECT name, open_mode FROM v$pdbs;
Therefore, if the pluggable database is mounted and not opened for read write operations, then run this statement and open it first –
alter pluggable database ORCLPDB open;
change ORCLPDB with the name of your database into which you are installing the sh schema.
Step 3 – Call the script. For that first write @? Followed by the location of sh_main.sql script.
Moreover since oracle home is the default location where Oracle starts searching for all the scripts thus you can omit that location from the path.
For example, if the location of sh_main.sql script is this
C:\App\db_home\demo\schema\sales_history\sh_main.sql
You can simply remove the Oracle Home from this path and write it like this –
@?\demo\schema\sales_history\sh_main.sql
Step 4 – Followed by the location of the sh_main.sql script write down all the parameters which we discussed above in the same order.
For the demonstration the final string will look something like this –
@?/demo/schema/sales_history/sh_main.sql sh USERS TEMP oracle C:/App/db_home/demo/schema/sales_history/ %ORACLE_HOME%/demo/schema/log/ v3 localhost:1521/orclpdb
That’s all you have to do. Once you are done with the execution, your sh schema is installed and configured on your Oracle Database.
Connect With The SH User –
To connect with your SH user simply write
Case 1: if already connected with the database
Connect sh/your_sh_pass @your_connect_string;
Case 2: If not connected with the database
SQLPLUS sh/your_sh_pass @your_connect_string;
F&Q on SH Schema
That is how you download and install Sales History (SH) schema on your Oracle Database. If you still have any doubts, then feel free to connect with me on my Facebook and Twitter.
Thanks, and have a great day!


