Prepare yourself for an exhilarating twist in our PostgreSQL journey! In our previous session, we delved into the process of connecting to PostgreSQL using the Command Prompt or Terminal. However, today we’re taking it up a notch by utilizing the formidable VS Code. We will be following the same steps, but with a twist: leveraging the power of VS Code. Without wasting any more time, let’s jump right in and embark on an extraordinary exploration of the remarkable capabilities of PostgreSQL in the VS Code environment. Brace yourself for a truly amazing experience!
Requirements for Setting Up PostgreSQL with VS Code
To connect to PostgreSQL, make sure you have properly installed VS Code on your machine. This requirement applies to all operating systems, including Windows, Linux, or Mac.
Process for Configuring PostgreSQL with VS Code
In the last session, we explored connecting to PostgreSQL using the Command Prompt or Terminal. Today, we’re going to shake things up by doing the exact same thing, but with a twist: we’ll be using the powerful VS Code instead. So, without further ado, let’s dive right in and discover the wonders of PostgreSQL in the VS Code environment. Prepare to be amazed!
Installing the SQLTools Plugin For PostgreSQL
- Open your VS Code.
- Head to the Marketplace and search for the ‘SQLTools’ extension (written as a single word).
- Install the ‘SQLTools’ extension by Matheus Teixeira.
- Once installed, locate the ‘SQLTools’ extension in the left-hand side extension bar, identifiable by its database-like icon.
Name: SQLTools Matheus Teixeira
VS Marketplace Link: https://marketplace.visualstudio.com/items?itemName=mtxr.sqltools
Installing the SQLTools PostgreSQL/Cockroach Driver
- Return to the Marketplace and search for ‘SQLTools PostgreSQL’ by Matheus Teixeira.
- Install the ‘SQLTools PostgreSQL/Cockroach Driver’ extension.
- Ensure that both the ‘SQLTools’ extension and the driver are successfully installed.
Name: SQLTools PostgreSQL/Cockroach Driver
VS marketplace Link: https://marketplace.visualstudio.com/items?itemName=mtxr.sqltools-driver-pg
Setting Up the Connection Assistant Form
- With the driver installed, go to the SQLTools extension in the extension bar.
- Click on ‘Add New Connection’ and select ‘PostgreSQL’.
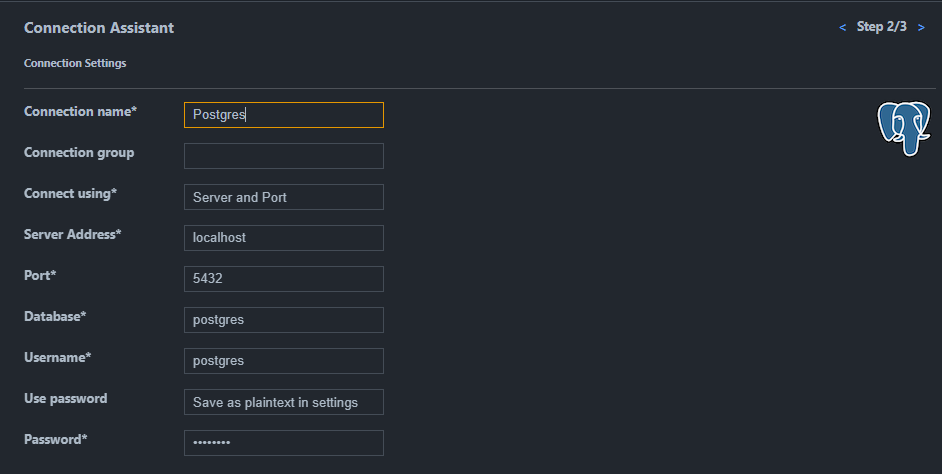
- Complete the Connection Assistant form using the installation string information:
- Enter a desired connection name.
- Leave the Connection Group field empty.
- Keep the Connect String set on “Server and Port”.
- Specify the Server address, using “localhost” if PostgreSQL is installed on the same machine or the IP address of a remote server.
- Use the default port number, 5432, for the Port field.
- Enter the name of the database to which you want to connect, using all lowercase letters for the default database, “postgres.”
- Provide the default username, “postgres,” in lowercase letters.
- Set the Use Password value based on your preference for security.
- Enter the password assigned during installation.
- Leave the remaining fields with their default values.
- Test the connection to ensure its success.

Handling Errors and Establishing Connection
- If any errors occur, ensure that your Docker container for PostgreSQL is running. Direct installations should not encounter similar issues.
- Once any errors are resolved, save the connection settings.
- From the connection panel, select the newly created connection, right-click on it, and choose “Connect.”
- This action opens a fresh SQL worksheet, ready for query execution.

Running SQL Queries
- Within the SQL worksheet, write and execute your SQL queries.
- As an example, let’s check the current user name with which we are connected:
SELECT current_user;
3. Execute the query by clicking the “Run On Active Connection” button.
Conclusion
Congratulations! You have successfully learned how to connect to the PostgreSQL server using the power of VS Code. This comprehensive tutorial guided you through installing the SQLTools plugin, configuring the PostgreSQL/Cockroach driver, setting up the connection assistant form, and executing SQL queries effortlessly. Armed with this newfound expertise, you are now equipped to explore the vast possibilities that PostgreSQL and VS Code offer. Thank you for joining us on this exhilarating twist in our PostgreSQL journey. We hope you found this tutorial informative and enjoyable. Start unleashing the potential of PostgreSQL with VS Code and have a great day!


