
Learn to unlock HR user in Oracle DB 19c. Now that Oracle Database 19c has been launched let’s configure it, so that we can start practicing on it. The best part of Oracle Databases is that, they always come with pre-designed, fully functioning sample schemas. And, you can use those sample users to start your journey with Oracle Database.
What are schemas in Oracle Database?
A schema is a collection of logical structures of data, or schema objects. Furthermore a schema is owned by a database user and has the same name as that of the user. Also, each user owns a single schema.
Now you must be having questions in your head like, what are the differences between user and schema or can a schema be created without a user or vice versa?
I think Tom Kyte has answered all these questions in this Ask Tom Thread. Check it out here. If you still have any doubts about Oracle Database Schema, then hit me up On My Facebook.
Has Oracle removed the sample schemas from Oracle 19c?
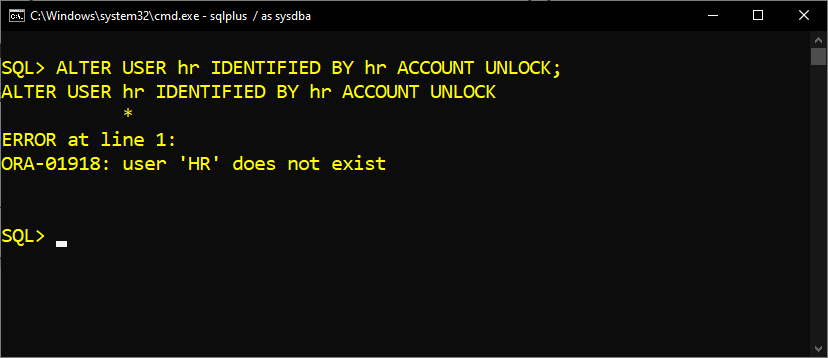
Common question you often ask me is – While trying to unlock the HR user, I am getting an error saying, “user HR does not exist”. Does it mean Oracle has removed the HR user from its latest version?
My answer is – No, all the HR schema is still there it’s just that you are searching them at the wrong place.
In multi-tenant architecture, HR users are placed inside the default pluggable database. And by default, the name of that pluggable database is orclpdb (provided you did not change it during the installation).
Now let’s come to our topic which is how to unlock HR user in Oracle 19c?
How To Unlock HR User In Oracle Database
Unlocking sample accounts like HR in Oracle 19c is a three-step process. These are –
- Create A TNS service
- Switch the Container, and
- Unlock the Account.
Let’s see what these three steps are and how we can unlock an account using them.
Step 1: Create A TNS Service.
TNS stands for Transparent Network Substrate. It’s Oracle Proprietary networking technology. And is used for establishing a peer-to-peer communication between Server and Client.
I have already done a detailed tutorial on TNS which you can check here. Anyways
In order to unlock the sample user in Oracle 19c we first need to create a TNS service for the pluggable database which contains those sample users. However in our case that pluggable database is orclpdb.
To create a TNS service for a database we need some information. Such as –
- Container ID
- Service Name
We need the container ID of the database for which we are creating a TNS service. Furthermore we will use this container id to find out our second requirement which is the service name.
Service Name – A service name is a logical representation of a database. A database is represented to clients as a service. Almost, all the time the database and its corresponding service shares the same name.
In Oracle Database a Service can also be defined as a TNS alias used by user to connect with the Database remotely.
Now let’s find out this information.
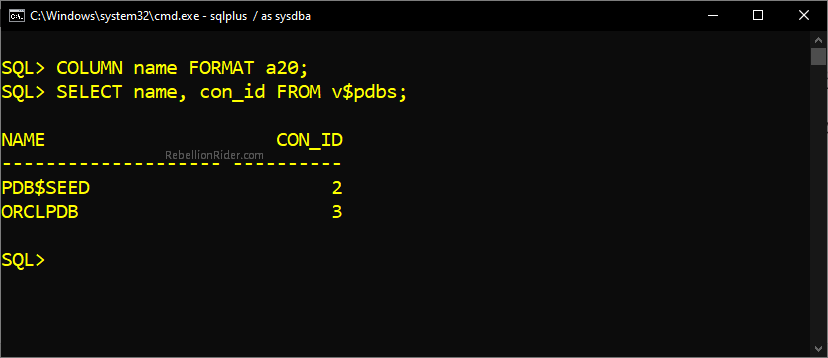
Find the container ID
To find out the container id of the pluggable database we need to query the v$pdbs view.
COLUMN name FORMAT a20;
SELECT name, con_id FROM v$pdbs;
This select statement will return the name and the container id of all the available pluggable databases.
So, now read the output carefully and find the name and the container ID of your default pluggable database. Which you have created during the installation. And, if you didn’t change it while installing Oracle 19c then its name must be orclpdb (default name of the default pluggable database)
Anyways in my case the name of the pluggable database which holds all my sample users is also orclpdb and its container ID is 3. Consequently, I will be using this information to find out the service name.
What is PDB$SEED?
PDB$SEED is the seed pluggable database created by Oracle Universal installer during the installation. Additionally, this seed pluggable database is used as a template for creating the user defined pluggable databases. And I suggest you not to mess with it. Anyways—
Find the Service Name.
In almost all the cases the database and its service share the same name. But I suggest you check it and be assured.
To find out the service name associated with our pluggable database we need to query the v$active_services view.
SELECT name as “Service Name” FROM v$active_services WHERE con_id =3;
This statement will return the name of the service associated with the pluggable database whose container id is 3. Which we know is the pluggable database orclpdb.
Create A TNS alias.
There are two ways of creating a TNS alias/service. These are –
- Using network configuration assistant (NetCA).
- Manually adding the entry into tnsnames.ora file.
Creating a TNS service using NetCA is always recommended. I have demonstrated a step-wise guide on how to create a TNS entry using Oracle NetCA in my previous tutorial. Click here to watch that. Moreover you can also download this guide in PDF format for free, just fill in the form given below.
Now let me show you how to add a TNS entry manually into tnsnames.ora file.
Locate the tnsnames.ora file.
In order to add a TNS service into tnsnames.ora file you first need to locate it. And you can find your tnsnames.ora file at
%db_home%\network\admin
Inside the admin folder you can find your tnsnames.ora file. However before you do any modifications to it, I suggest you to make a backup copy of it.
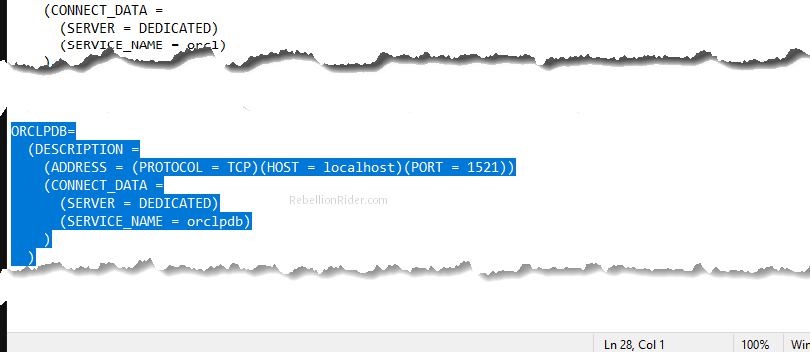
Create a TNS service.
Creating a TNS service manually will be a lot easier. Simply copy any TNS service which is already created and paste it at the end of the file. After that you have to modify this entry. These are the changes which you have to do.
Name: Since, we are creating a TNS service for our pluggable database orclpdb, thus we will name our TNS ORCLPDB. Though it is not mandatory, you can name it whatever you want.
Protocol Address: Protocol address is comprised of three things. These are-
- Hostname
- Port Number, and
- Network protocol
Almost, all the time the protocol address of a TNS service is same as the listener of your database. Which means you can check your listener.ora file to find all this information.
You can find listener.ora file in the same directory where your tnsnames.ora file is stored.
%db_home%\network\admin
Anyways, the default values for the protocol address are –
Hostname: It is set to either localhost or the IP address of the system where your Oracle DB is installed and configured
Port Number: Oracle Database uses 1521 as the default port number for communication on the network.
Protocol: By default, Oracle Database uses TCP Network Protocol for network communication.
Step 1 create a TNS service has been done here.
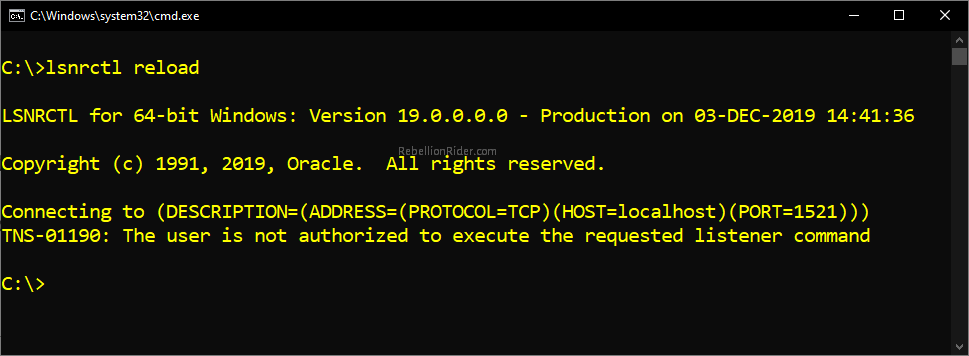
Reload the listener
You need to reload the listener in order to let all the modifications which you just did settle down.
Therefore, open your command prompt and just write
>>lsnrctl reload
This will reload your listener and your TNS service which you just created all set to be used.
Step 2: Switch The Container.
In multitenant architecture, when you log on to your database using sys user it will connect you using the default container database CDB$ROOT. But as said earlier that all the sample schemas are placed inside the default pluggable database ORCLPDB. Because of that we need to switch the container from cdb$root to orclpdb.
Here are the steps of switching containers in Oracle 19c. But if you love watching videos then I have done a short video on my Facebook showing the process of switching the containers. And I will embed that video at the end of this section.
Step 2.1: Fire up your SQL*Plus
Open up your command prompt and write –
sqplus / as sysdba
Now you will be presented with your SQL prompt.
Step 2.2: Switch the container
To switch the container, you need to perform an ALTER DDL. Which is –
ALTER SESSION SET container = ORCLPDB;
In this statement ‘ORCLPDB’ is the name of the pluggable database. And it has all the sample schemas.
Before we unlock our sample user we just need to make sure that our pluggable database ‘orclpdb’ is open. So let’s check that –
COLUMN name FORMAT a20;
SELECT name, open_mode FROM v$pdbs;
If the result of the above statement is ‘Read Write’ then it means your pluggable database is open and you can perform ALTER USER DDL. If not, then it means the pluggable database is not open.
If that is the case, then we need to open our pluggable database. For that you simply have to write another SQL statement which is –
ALTER PLUGGABLE DATABASE open;
That’s all you have to do. All the settings has been done and we are ready to unlock our sample users.
Step 3: Unlock the HR user in Oracle 19c.
To unlock the HR user in Oracle 19c you can use the old and trusted ALTER USER DDL. Like this
ALTER USER hr IDENTIFIED BY <your_pass> ACCOUNT UNLOCK;
Furthermore, in the above statement replace <your_pass> with the password for your HR user. On successful execution of the above DDL statement your HR schema will be unlocked.
That is how we unlock HR user in Oracle database 19c. Hope you enjoyed reading.
Thanks and have a great day!


