
In this tutorial you will learn how to properly uninstall Oracle Database 19c from Windows operating system. For the demonstration I will be using Windows 10. However you can follow these steps to uninstall 19c from any Windows OS as the process is the same.
A Quick Warning
Uninstallation of Oracle 19c from Windows 10 or any other windows OS requires you to delete or modify windows registries and other components like Oracle Home directories and Windows services. This could result in a catastrophic event like crashing your system or application. So, follow this tutorial at your own risk and be cautious. If you mess up I won’t be responsible for that.
Process of Uninstalling Oracle Database 19c
It’s a 5 step process to uninstall Oracle database 19c from Windows 10. These 5 steps are –
- Delete the Environment Variable
- Delete the Registries
- Restart the Machine
- Delete Oracle Home Users and Groups
- Delete Oracle 19c
Now let’s start with the steps one by one.
Step 1: Delete the Environment Variable
If you want to uninstall Oracle Database 19c for the purpose of re installing it or planning to install any other version of Oracle Database, then deleting Environment Variable is not only important but also recommended. Not doing so will cause “Environment Variable Path Is Too Long” Error.
How to Delete The Environment Variable?
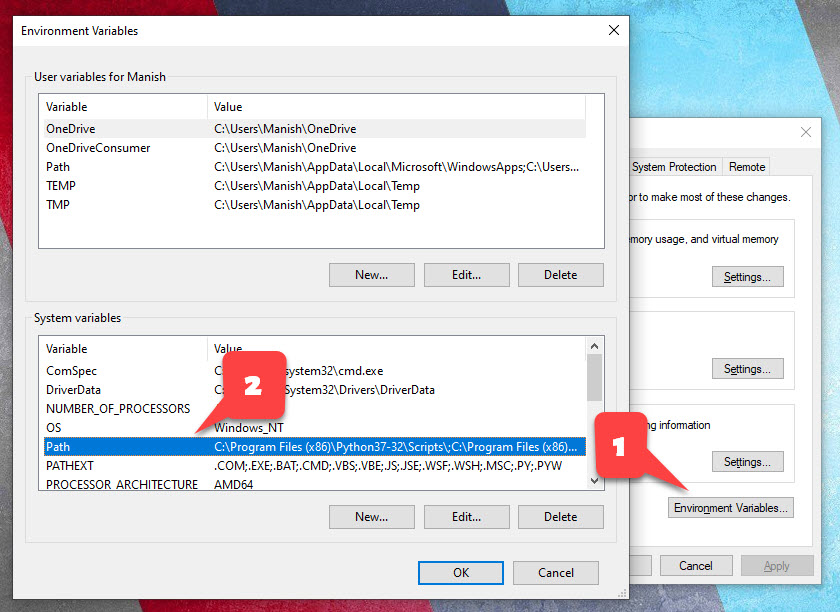
To delete the Oracle database 19c’s environment variable first launch the Windows 10’s search utility by pressing Windows Key + Q. After that simply search “Environment Variable”. This search will show you “Edit the System Environment Variables” app.
Click on the app and open it – After that you will be on the “Advance Tab of System Properties”. Here Click on The Button named “Environment Variables”. This button will be at the bottom of the windows.
Next, come to this “System Variables” section and search variable name Paths. Just double click and open it.
Here you will see a list of all the environment variables. Don’t delete anything here except the location of your Oracle Home.
In my case this location looks something like this.
C:\App\db_home
This could be different in your case. So be careful and delete accordingly.
Step 2: Delete the Registries of Oracle 19c
This is a very crucial step of the entire process. While performing this step you need to be extra careful.
Before performing this step, you need to take care of two things. These are –
- Only delete the registries that are listed below and nothing else.
- If you have any other software from Oracle Installed on your system, then consult your admin before deleting anything.
In any case it’s always best to take the backup of your registries first. In this quick video that I published on my Facebook Page I have shown how to take the back up of the registries. Do check that out.
Names of Oracle Database 19c registries –
There are total 6 registries that are related to Oracle 19c. These are –
- OracleJobSchedulerORCL
- OracleOraDB19Home1MTSRecoveryService
- OracleOraDB19Home1TNSListener
- OracleRemExecServiceV2
- OracleServiceORCL
- OracleVssWriterORCL
ORCL is the SID that I have assigned to my Oracle Database. This could be different for you.
Location of Oracle Database 19c registries –
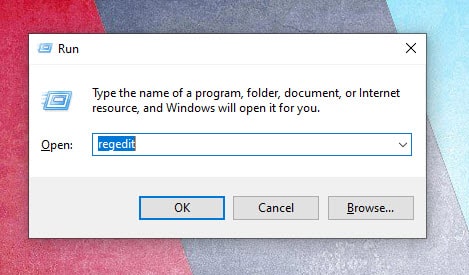
You can locate all these registries inside the “Registry Editor” of your Windows operating system. To open the Registry Editor, you first need to launch the “Run Dialog Box”.
Press Windows Key + R that will open your Run Dialog Box.
Inside the Run box simply write “Regedit” and press enter. That will open your Registry Editor.
Next step is to locate the above-mentioned registries.
You can find all the above-mentioned registries at this location-
HKEY_LOCAL_MACHINE\SYSTEM\CurrentControlSet\Services\
Just traverse to this location and delete all the registries that are listed above. Just be careful.
One More Registry
Along with these 6 registries there is one more that we have to delete. The name of this registry is “Oracle”. And you can find it at this location –
\HKEY_LOCAL_MACHINE\SOFTWARE
This registry contains important information of Oracle Database 19c like DB_Home, SQLPATH, location for your control file and archive file, your SID etc.
Once again, before deleting this registry make sure only oracle database 19c software is installed on your system. In addition to that if you have other software from oracle installed then take a good look at the contents of this folder and delete only those associated with Oracle Database 19c.
Step 3: Restart the Machine
So far, we have done major modifications to our Windows 10 operating system. Moreover, to make these changes settle down and come to effect, we must restart our system.
Restarting the system is important for up coming steps. So, just do it.
Step 4: Delete Oracle Home Users and Groups
In order to manage the working of Oracle Database 19c Database Management system, Oracle Universal Installer (OUI) creates 14 windows groups. Furthermore, the OUI manages those user groups using a dedicated windows user, that you have created during the installation.
Name of Oracle 19c User Groups –
There are total 14 user groups, the name of these groups are as follow –
- ORA_ASMADMIN
- ORA_ASMDBA
- ORA_ASMOPER
- ORA_CLIENT_LISTENERS
- ORA_DBA
- ORA_DBSVCACCTS
- ORA_GRID_LISTENERS
- ORA_INSTALL
- ORA_OPER
- ORA_OraDB19Home1_DBA
- ORA_OraDB19Home1_OPER
- ORA_OraDB19Home1_SYSBACKUP
- ORA_OraDB19Home1_SYSDG
- ORA_OraDB19Home1_SYSKM
Where To Find Oracle 19c Windows Groups and Users –
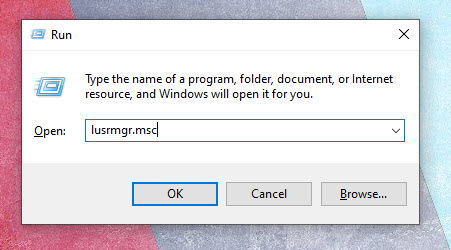
In windows OS all the Users and Groups are organized under “Local Users and Groups Windows”. You can open this window using “lusrmgr.msc” command. You simply have to write this command in your Run Dialog Box and hit enter.
Inside “Local Users and Groups window” you will find two directories “Users” and “Groups”.
All the Oracle Database 19c’s users and groups are placed inside these two directories.
Delete the Oracle 19c’s Windows User –
First get inside the “Users” directory and locate the Window user which you created during the installation of your Oracle Database 19c and delete it.
Delete the Oracle User Groups –
After deleting the windows user next you have to delete the User Groups that I listed above. Additionally, you can find all the above-mentioned Oracle Database 19c groups under the “Groups” directory.
So, just get inside that directory and delete all the groups one by one.
Also, make sure to delete only those Groups that I mentioned above in this blog and nothing else.
Step 5: Delete the Oracle Database 19c
Now that we have deleted all the registries, users and groups we are free to delete the Oracle 19c’s files and directories from our Operating system. Furthermore, the two main directories where Oracle Universal Installer has saved all the Oracle Database 19c related files and folders are –
- Oracle Home, and
- Oracle Base
What is Oracle Home?
Oracle Home is the directory where oracle database software is installed in your operating system’s file structure.
Now find your Oracle Base and Oracle Home and simply delete those folders.
Suggested Reading: How Find the Oracle Home and Base
Not Able to Delete the Directories –
Meanwhile, last time many viewers complained that they were not able to delete the files and directories. In this case chances are there that your system could have a pending restart so first restart your system and try again. However, if this still doesn’t solve your problem, then reboot your windows 10 in safe mode and then delete that file or folder.
Just One More Oracle 19c Directory –
After deleting your Oracle Base and Home next you have to delete the directory that Oracle Universal Installer (OUI) has created inside the Program File folder.
Additionally, you can find “Program File” folder inside your main drive where your OS is installed. Just get inside and find the directory with the name “Oracle” and delete it.
With this our uninstallation is done. So, that’s how we wipe out Oracle Database 19c from our Windows 10.
In case if you still have any doubts then I suggest you to watch this video on how to uninstall oracle database 19c.
You can also reach me out on my Facebook or Instagram.
Thanks and have a great day!


